|
|
|
|
BEAM From the Ground Up is a BEAM Reference Library site.
Influencing an Nv net
How to "steer" an Nv net -- Bruce
Robinson and Wilf Rigter explain all...
You can use (among other things) Wilf's Power Smart Head to influence an Nv net, yet not interfere with it. The Power Smart Head uses half of a 74HC240 chip -- you can use the other half of the chip to make a couple of filtering circuits, as shown here (1- and 2-digit red numbers are 74HC240 pin numbers):
|
|
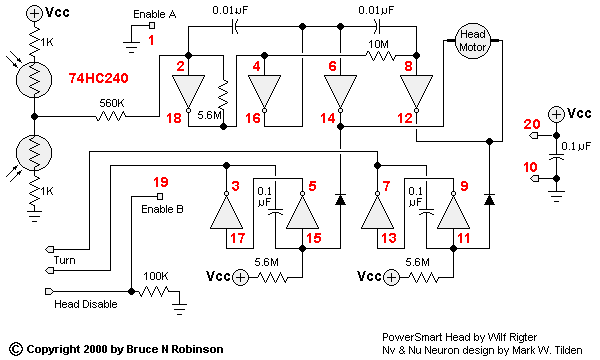
BotDoc posted a schematic a while back that used the same circuit to contol the enable pins on his "hemicore", but you can also use the circuit to switch a couple of biasing resistors in and out of a quadcore. Connect a couple of large resistors (say 3 times the size of the timing resistors in your quadcore) to the two connections marked "turn", and hook these up to the bias points in your quadcore.
When the head is locked on, both outputs are low; when the head is turning, one output is low low and one high.
Best of all, the circuit works even without the head! To get started you can build the Power Smart Head circuit, mount the LDRs on the robot body, and get some phototropic behavior; later you can add an actual head. Note that the problem with hooking up LDRs directly to your microcore is that they usually don't respond well over the full range of light conditions you might run into.
Head circuits like the Power Smart Head design are intended to produce a differential output whenever the light striking the LDRs is out of balance. When the LDRs are mounted directly on the body, the differential output will exist until the whole body is pointed straight at the light source. When they are mounted on a head, the differential output exists only until the head is pointing at the light source.
When you use the head circuit output to turn both the head AND the robot, the robot will turn only until the head "locks on" to the light source. After that, it will continue walking in a straight line.
This may be exactly what you want. In a room full of light and shade, the robot will walk along, veering toward one bright area and then another one, but never heading straight for the brightest light. If you have a single bright source, the walker could end up circling the light, finding an optimum radius (assuming there is enough unobstructed room). Or the walker could end up spiralling in toward the light, or outward away from it. Exact behaviour depends on many factors: body dimensions, leg geometry, walker circuit delays and motor speeds, head motor speed, degree of shading of the LDRs, and so on.
However, if your intention is to build a robot that (1) looks for the brightest light with its head, and (2) turns toward the light until it points straight at it, then you have a problem. The head will find the light first, and then there will no longer be a signal to cause the walker to turn. One solution, successfully tested by Jim Mullins, is to use a light spring that tries to keep the head pointed straight ahead. The Power Smart Head circuit will turn the head toward the light, but as soon as it "locks on", the head motor shuts off and the spring begins to turn it away from the light. This causes the head circuit to start up again, and so on. The net effect is to keep the head circuit operating until the walker turns sufficiently to line the head up with the body. Jim, by the way, attributes the original spring idea to Dennison Bertram.
Here's a more-generic look at how to use a Power Smart Head or other circuit to influence a quadcore [in particular, Bruce talks here about influencing a quadcore that's driving a 2-motor walker, Ed.]. Component values will vary according to your design and your motors. Relative sizes of resistors are a good illustration of the principles.
|
|

This shows one way of connecting a couple of "normally low" turn inputs to a quadcore. With the turn input low, the 3 M resistor in the quadcore gets connected to ground though the diode; the 1 M resistor is bypassed and has no effect.
When the turn input goes high, the diode blocks the signal and the Nv is now connected to ground through a 3 M + 1 M = 4 M of resistance. This means the delay for the neuron is longer, so the motor turns a little further.
Since only one of the turn inputs will be high at any given time, the motor will turn a little further each time, thus shifting the robot around in a slow circle.
You have to be careful about how big the second (1 M) resistor is in relation to the main resistor. It's tempting to make it bigger in order to get the robot to turn faster. But remember, the motor turns a little further on each step, so it's possible to have the legs turn so far that the robot topples over. Better to make slight changes on each step and make a wider turn. Centering springs on the "turning" motor make a big difference.
|
|
This shows another way of connecting "normally low" turn inputs to a quadcore. With the turn input low, the 10 M and 2 M resistors are connected in parallel, effectively giving you about 1.7 M of resistance to ground. When the turn input goes high, the 10 M resistor is connected to Vcc, thus slowing down the rate at which the capacitor discharges. At the same time, there is now 2 M of resistance to ground, so this also slows down the Nv. This way you get two slowing effects.
The problem you can encounter is if the 10 M resistor is too small compared to the main resistor, it might not be possible for the inverter to ever reach it's low-going threshold, so the Nv will stay active for ever, and the motor will try to turn in circles. The optional diodes shown in the dotted box will eliminate this problem.
These are two methods of changing a quadcore's timing to create a turning robot. Any thing you can come up with to give low / high signals at the turn inputs will cause the robot to turn; a couple of touch sensors operating a pair of Nu neurons, for example, will also work.
These circuit modifications need to be tested on the breadboard, preferably with your walker connected by a tether. It's also a good idea to take a page from Chiu's book and provide sockets for your resistors on the actual walker, so you can make additional adjustments to your "completed" robot.
Making a walker turn by changing the delays in some of the neurons sounds like a simple idea. In practice it doesn't always work as well as expected. It's important to always keep in mind that mechanics is just as important as electronics, and that the two must be integrated. Things like body length, leg width, angle of the motors, which motor you choose to be the "turning" motor ... all these affect the way a robot turns.
As a VERY rough guide, to make the walker turn more quickly use wide legs, short body, and change the delays on the rear motor. You will likely need to use a centering spring (or elastic band) on the rear motor.
Above all, be prepared to experiment, and don't expect to get it exactly right the first time.
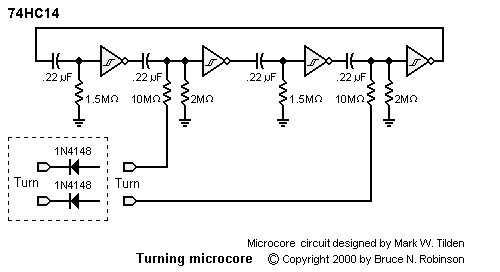
Over the past few years, Wilf has also posted a number of circuits, showing how to influence a bicore's timing. You can adapt many of these to Nv nets of other order:
|
|
|
I've got write-ups on heads in general here, and on walkers (most likely to gain a head) here. Meanwhile, Bruce Robinson has a fascinating site
up on an invention of his -- the Optically-Coupled
Bicore. |
|
|
||
|
|
This page was last updated on |
|