|
|
|
|
The BEAM Bestiary is a BEAM Reference Library site.
Design of 2 motor walkers
BEAM walkers with 2 motors and 2
or more legs
Let's return to our "strawman" 2-motor / 4-legged walker layout:
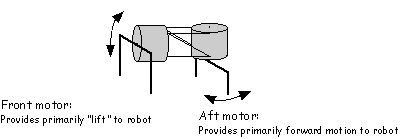
A number of different takes are available on this basic 2 motors, but all walk using the same basic principle.
|
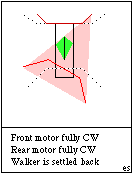
This kind of 'bot walks via careful positioning of walker CG, and good timing of motor motion. The core idea is that you want your walker's CG to be in an allowable range near the middle of the 'bot, so that as the motors move, the walker's weight will shift naturally from the front legs, to the rear legs, and back again. By keeping your walker's CG in the allowable range, your walker's weight shifting will assure that the walker always has one "unloaded" foot it can move. Meanwhile, the walker is being supported by 3 of 4 legs almost all of the time. This means you need to build this kind of walker such that its CG is in a selected region (in particular, one that will allow the walker's weight to "shift" correctly). Also note that in order to make this geometry walk smoothly, the rear motor will "lead" with a given motion, with the front motor following. I discuss different ways to accomplish motor control elsewhere. I've tried to show these mechanics in the JavaScript animation to the right -- the lightly-shaded triangle / quadrangle shows where the walker's weight is being supported at a given step, the green diamond shows the walker's allowable CG range. |
|
In part to help me get a handle on this physics, and in part to actually build walkers, I came up with a JavaScript 2 motors balance calculator. It's been sort of a tradition to build a walker body first, then fiddle with the leg shape in order to make the walker's balance work. This calculator allows you do follow more-traditional engineering process -- by completely designing your walker (including legs) before you start building anything.
When you're starting to design your own walker, you'll need to pay particular attention to four big topics -- motor geometry, leg design, motor range of motion / phasing, and body design.
Motor geometry
There are a number of ways to line up two motors and achieve
a good walking gait. The motor geometry shown at the top of
this page (officially unnamed, but let's call it the
"orthogonal" geometry for the sake of discussion) shows up
in a number of 2-motor designs. Overall, though, the front
motor's shaft isn't always horizontal; the rear motor's
shaft isn't always vertical. One of the most-popular
geometries is shown below -- this is the "Miller" geometry,
named after its inventer, Andrew Miller:
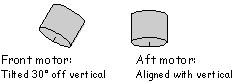
I'm still struggling to come up with an objective way to compare the performance of different motor geometries. Proponents of the "Miller" geometry feel that it provides for more-efficient walking, as the front motor provides thrust as well as lift. Proponents of the orthogonal geometry (see diagram at top of this page) feel that it maximizes a walker's ability to climb over obstacles. They may both be right; I have yet to fully test this myself.
Leg design
First and foremost, bear in mind that functionally, the
shape of the legs isn't as important as where they contact
the ground with respect to the walker body (so leg shape can
be an item for primarily artistic consideration). With that
in mind, let's look at all the elements of leg design you'll
need to consider:
- Maintaining mirror symmetry of foot touch-down points along the walker center-line is absolutely essential for straight walking.
- You should try to design your legs to maintain a low-slung (w.r.t. width) stance. In particular, you don't want your front motor axis very far off the ground (height here is particularly likely to make your walker "tip prone").
- Your leg construction should be light & stiff, with just a a little bit of "springiness."
- The length of each leg should generally be comparable to the frame length.
- Don't get too far in your leg design until your walker body & electrical designs are set -- legs are a convenient place to "fix" walker balance problems that can't easily be fixed elsewhere.
- It's also helpful if your legs are easily attached to / removed from your motors -- this allows you to build temporary "test" legs, then once you're happy with their design, put "final" pretty legs on your bug.
Motor range of motion and
phasing
The timing and duration of each motor's motion is a function
of your electronics and motor selection. Basically, a
motor's range of motion will be set by your selected motor's
speed at a given voltage (see my gearmotor comparison page),
together with the duration your control electronics is
driving it for. Meanwhile, the phasing of each motor's
motion with respect to the other motor is strictly a
function of your control electronics -- I've got more
discussion on that here.
As a rule-of-thumb, if a motor moves more than about +/- 45 degrees, it seems to destabilize a walker.
Body design
The design of your walker body will go hand-in-hand with
your construction technique, so you'll want to give this all
a fair amount of thought. Regardless of your construction
scheme, you'll want to aim for the following design
goals:
- Short-trunked -- as a general rule, you want
to keep the distance between motors as short as possible.
If everything else is left alone, lengthening a walker's
frame leads to a smaller and smaller allowable CG range.
To keep a walker's gait correct, your legs must grow
proportionally as the walker's body gets longer.
Accordingly, a long-framed walker must have
proportionally-very-long legs (and this stresses the
walker's motor, along with being tough to keep your long
legs sufficiently stiff).
- Light -- remember that we're building a small
walker here; the lighter you make it, the easier your job
will be. Note that weight tends to snowball -- a heavy
walker needs stronger motors and a bigger power source,
which makes the walker even heavier, which increases the
motor and power source size... Very small walkers can use
"jumbo" paperclips for frame material; bigger walkers can
use welding rod, coat-hanger wire, or PCB material.
- Symmetry is a really good thing, keep your
walker's weight along its center-line to avoid balance
problems.
- Low-slung -- you'll want your frame to be pretty low, as low to the ground as you can get and still give your walker enough "clearance" to get over any obstacles you want it to overcome. The higher your walker's CG is, the more likely it is to tip over when it steps on an obstacle.
From a practical standpoint, you'll also want to think a
bit about how you'll attach your motors to your frame. If
you use very expensive motors, you'll want some attachment
scheme that allows you to later remove the motors (probably
without destroying your walker).
|
|
||
|
This page was last updated on |
|
|